启停活动页面
-
启动和结束
// 从当前页面跳转到新的页面 startActivity(new Intent(source.this,target.class)); // eg startService(new Intent(MainActivity.this, FloatingButtonService.class)); // 从当前页面回到上一个页面,相当于关闭当前页面, finish(); // 结束当前的活动页面 -
生命周期
即状态转换的过程
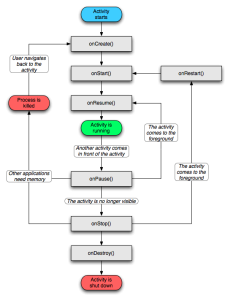
Activity的七个生命周期方法- onCreate:创建活动。把页面布局加载进内存,进入初始状态,这个方法会初始化setContentLayout()方法(屏幕绘制),
- onStart:开始活动。把活动页面显示在屏幕上。onCreate()方法完成后,此时activity进入了onStart()方法,当前activity是用户可见状态,但是还不能交互,在此可以做一些动画的初始化操作。
- onResume:恢复活动。onStart()后activity进入onResume方法,当前activity状态属于运行状态,(Running),此时的activity可见可交互。
- onPause:暂停活动。在系统进行另一个activity是调用,此时通常用于确认对于持久性的数据保存更改,动画的停止以及任何其他可能消耗cpu的内容,该方法执行后,下一个Activity才能开始执行,该方法执行后应该执行onStop()方法,
- onStop:停止活动。当Activity对于用户不在可见的时候调用,可能是被另一个Activity覆盖,或者退回到桌面,在onStop方法下系统内存紧张时,有可能会被系统回收,
- onDestory:销毁活动。在Activity被销毁前调用,这是Activity收到的最后调用,当Activity结束或者被系统销毁Activity实例的时候,会被调动该方法,
- onRestart:重启活动。在Activity被停止后再次启动的时候调用,比如从桌面回到应用中时,然后调用onStart方法().
- onNewIntent:重用已有的活动实例。(比较特殊的周期过程)

public class Toggle02Activity extends AppCompatActivity {

    @Override
    protected void onCreate(Bundle savedInstanceState) {
        super.onCreate(savedInstanceState);
        setContentView(R.layout.activity_toggle02);
        findViewById(R.id.button01).setOnClickListener(view -> {
//            finish();
            startActivity(new Intent(this,Toggle01Activity.class));
        });

        System.out.println("ActivityA is Create");
    }
    @Override
    protected void onStart() {
        super.onStart();
        System.out.println("ActivityA is start");
    }
    @Override
    protected void onResume() {
        super.onResume();
        System.out.println("ActivityA is Resume");

    }
    @Override
    protected void onPause() {
        super.onPause();
        System.out.println("ActivityA is Pause");
    }
    @Override
    protected void onRestart() {
        super.onRestart();
        System.out.println("ActivityA is restart");
    }
    @Override
    protected void onStop() {
        super.onStop();
        System.out.println("ActivityA is Stop");
    }
    @Override
    protected void onDestroy() {
        super.onDestroy();
        System.out.println("Activity is Destroy");
    }
}-
启动模式
Activity实例,以栈的形式进行存储,也就是所谓的任务栈先进后出。
主要有2个基本操作:压栈和出栈,其所存放的Activity是不支持重新排序的,只能根据压栈和出栈操作更改Activity的顺序。启动一个Application的时候,系统会为它默认创建一个对应的Task,用来放置根Activity。默认启动Activity会放在同一个Task中,新启动的Activity会被压入启动它的那个Activity的栈中,并且显示它。当用户按下回退键时,这个Activity就会被弹出栈,按下Home键回到桌面,再启动另一个应用,这时候之前那个Task就被移到后台,成为后台任务栈,而刚启动的那个Task就被调到前台,成为前台任务栈,手机页面显示的就是前台任务栈中的栈顶元素。-
标准模式(standard)
-
栈顶复用模式(singleTop)
-
栈内复用模式(singleTask)
-
单例模式(singleInstance)
-
启动模式的设置
启动模式有2种设置方式:1、在AndroidMainifest设置、2、通过Intent设置标志位 -
在AndroidMainifest设置
打开AndroidMainifest.xml,给Activity节点添加属性android:launchMode,属性值填入standard表示采取标准模式,默认不添加也是标准模式。<activity android:name="com.demo.Main4Activity" //通过android:launchMode属性设置 android:launchMode="singleTask"/> -
通过Intent设置标志位
Intent inten = new Intent (ActivityA.this,ActivityB.class);
//通过Intent的Flag设置
// intent.addFlags(Intent,FLAG_ACTIVITY_NEW_TASK);
intent.setFlags(Intent,FLAG_ACTIVITY_NEW_TASK);
startActivity(intent);
-
代码中的启动标志取值说明
| intent类的启动标志 | 说明 | |
|---|---|---|
| FLAG_ACTIVITY_NEW_TASK | 指定启动模式为栈内复用模式(SingleTask)。开辟一个新的任务栈。该值类似于standard;不同之处在于,如果原来不存在活动栈,则会创建一个活动栈 | |
| FLAG_ACTIVITY_SINGLE_TOP | 指定启动模式为栈顶复用模式(SingleTop)。等同于launchMode="singleTop",当栈顶为待转跳的活动实例时,则重用栈顶的实例 | |
| FLAG_ACTIVITY_CLEAR_TOP | 所有位于其上层的Activity都要移除,SingleTask模式默认具有此标记效果,但singelTask采用onNewIntent方法启动原任务,而它采用先调用onDestroy再调用onCreate来创建任务。当栈中存在待转跳的活动实例时,则重新创建一个新实例,并清除原实例上方的所有实例。 | |
| FLAG_ACTIVITY_NO_HISTORY | 该标志与standard情况类似,但栈中不保存新的启动的活动实例,下次无论以何种方式再启动该实例,也要走standard模式的完整流程 | |
| FLAG_ACTIVITY_CLEAR_TASK | 该标志非常暴力,转跳到新页面时,栈中的原有实例都被清空,注意该标志需要结合FLAG_ACTIVITY_NEW_TASK使用,即setFlags方法的参数为"FLAG_ACTIVITY_CLEAR_TASK | FLAG_ACTIVITY_NEW_TASK" |
应用实例
- 不来回跳转页面
// 创建一个意图对象,准备跳转到指定的活动页面 Intent intent = new Intent(this,JumpFirstActivity.class); // 当栈中存在待转跳的活动实例时,则重新创建该活动的实例,并清除原实例上方的所有实例 intent.setFlags(Intent.FLAG_ACTIVITY_CLEAR_TOP); // 设置启动标志 startActivity(intent); // 转跳到意图指定的活动页面 - 登录成功后,不再返回登录页面
// 创建一个意图对象,准备跳转到指定的活动页面
Intent intent = new Intent(this,LoginSuccessActivity.class);
// 转跳到新的页面时,栈中的所有实例都被清空,同时开启新任务的活动栈
intent.setFlags(Intent.FLAG_ACTIVITY_CLEAR_TASK | Intent.FLAG_ACTIVITY_NEW_TASK); // 设置启动标志
startActivity(intent);  // 转跳到意图指定的活动页面
在活动页面之间传递消息
- 显式intent和隐式intent
显示Intent,直接指定来源活动与目标活动,属于精确匹配。有三种构建方式:
1 在intent的构造函数中指定Intent intent = new Intent(this,ActivityNextActivity.class); startActivity(intent);2 调用意图对象的setClass方法指定
Intent intent = new Intent();
intent.setClass(this,ActivityNextActivity.class);
startActivity(intent);
3 调用意图对象的setCompoent方法指定
Intent intent = new Intent();
ComponentName component = new ComponentName(this,ActivityNextActivity.class);  // 可以指定 包名 活动页名
intent.setComponent(component);
startActivity(intent);
隐式意图Intent
没有明确指定要跳转的目标活动,只给出一个动作字符串让系统自动匹配,属于模糊匹配
常见系统动作的取值说明Intent类的系统动作常量名 系统动作的常量值 说明 ACTION_MAIN android.intent.action.MAIN App启动时的入口 ACTION_VIEW android.intent.action. VIEW 想用户显示数据 ACTION_SEND android.intent.action.SEND 分享内容 ACTION_CALL android.intent.action.CALL 直接拨号 ACTION_DIAL android.intent.action.DIAL 准备拨号 ACTION_SENDTO android.intent.action.SENDTO 发送短信 ACTION_ANSWER android.intent.action.ANSWER 接听电话
示例1调用系统拨号
        String phoneNo = "1234567890";
        Intent intent = new Intent(); // 创建一个新的意图
        intent.setAction(Intent.ACTION_DIAL); // 设置意图动作为准备拨号
        Uri uri = Uri.parse("tel:"+phoneNo); // 声明一个默认的拨号的Uri
        intent.setData(uri); // 设置意图前往的路径
        startActivity(intent); // 启动意图活动页面
示例2发短信
      //        发短信
        String phoneNo = "1234567890";
        Intent intent = new Intent(); // 创建一个新的意图
        intent.setAction(Intent.ACTION_SENDTO); // 设置意图动作为准备发短信
        Uri uri = Uri.parse("smsto:"+phoneNo); // 声明一个发短信的Uri
        intent.setData(uri); // 设置意图前往的路径
        startActivity(intent); // 启动意图活动页面
示例3调到其他app应用
      //        跳到其他app应用
        String phoneNo = "1234567890";
        Intent intent = new Intent(); // 创建一个新的意图
        intent.setAction(android.intent.action.HAHAHAH); // 设置意图动作为调用指定的app活动页名(这个必须要进程中存活的,如果是安装的也能唤醒新的进程)
       intent.addCategory(Intent.CATEGORY_DEFAULT); // 指定调用的app类名
      startActivity(intent); // 启动意图活动页面
在AndroidMainfest.xml里的intent-filter就是配置文件中的过滤器。
其中android.intent.action.MAIN表示App的入口动作,android.intent.category.LAUNCHER表示在桌面上显示App的图标
-
向下一个Activity发送数据
Intent使用Bundle对象存放待传递的数据信息数据类型 读方法 写方法 整数型 getInt putInt 浮点数 getFloat putFloat 双精度数 getDouble putDouble 布尔值 getBoolean putBoolean 字符串 getString putString 字符串数组 getStringArray getStringArray 字符串列表 getStringList putStringList 可序列化结构 getSerializable putSerializable 发送页面
private TextView tv_send;

@Override
protected void onCreate(Bundle savedInstanceState) {
    super.onCreate(savedInstanceState);
    setContentView(R.layout.activity_intent_send);
    tv_send = findViewById(R.id.tv_send);
    Button btn_send = findViewById(R.id.btn_send);
    btn_send.setOnClickListener(handler);

}

private View.OnClickListener handler = new View.OnClickListener() {
    @Override
    public void onClick(View v) {
        switch (v.getId()) {
            case R.id.btn_send:
                //do something
                Intent intent = new Intent();
                intent.setClass(IntentSendActivity.this, IntentReceiveMainActivity.class);
                Bundle bundle = new Bundle();
                bundle.putString("request_time", Utils.getNowTime());
                bundle.putString("request_content",tv_send.getText().toString());
                intent.putExtras(bundle);
                startActivity(intent);
                break;

        }
    }

};
接收页面
@Override protected void onCreate(Bundle savedInstanceState) { super.onCreate(savedInstanceState); setContentView(R.layout.activity_intent_receive_main); tv_receive = findViewById(R.id.tv_receive); Intent intent = new Intent(); Bundle bundle = getIntent().getExtras(); String request_time = bundle.getString("request_time"); String request_content = bundle.getString("request_content"); String desc = String.format(" 收到请求消息:\n请求事件为%s\n请求内容为%s", request_time, request_content); tv_receive.setText(desc); Button btn_from_receive_to_send = findViewById(R.id.btn_from_receive_to_send); btn_from_receive_to_send.setOnClickListener(clickFn); } -
向上一个(返回的)Activity发送数据
利用回调数据式传值跳转:上一个页面调用startActivityForResult()(已废弃)方法;下一个页面接收并解析请求数据,下一个页面在返回上一个页面时,打包应答数据并调用setResult方法返回数据包;上一个页面重写方法onActivityResult,解析获得下一个页面的返回数据。
上一个页面private TextView tv_send; private TextView tv_receive; private ActivityResultLauncherregister; @Override protected void onCreate(Bundle savedInstanceState) { super.onCreate(savedInstanceState); setContentView(R.layout.activity_intent_send); tv_send = findViewById(R.id.tv_send); tv_send.setText("这是发送给其他活动页的数据"); Button btn_send = findViewById(R.id.btn_send); btn_send.setOnClickListener(handler); tv_receive = findViewById(R.id.tv_receive); Button btn_send_and_receive = findViewById(R.id.btn_send_and_receive); btn_send_and_receive.setOnClickListener(returnHandler); // startActivityForResult(intent,6666); // 已要废弃了 // 注册下一页面返回时使用的回调方法 register = registerForActivityResult(new ActivityResultContracts.StartActivityForResult(), new ActivityResultCallback () { @Override public void onActivityResult(ActivityResult result) { // 取出回调返回的数据 if (result!=null) { Intent intent = result.getData(); if (intent!=null && result.getResultCode()== Activity.RESULT_OK) { Bundle bundle = intent.getExtras(); String response_time= bundle.getString("response_time"); String response_content = bundle.getString("response_content"); String desc = String.format(" 收到响应消息:\n响应事件为%s\n响应内容为%s", response_time, response_content); tv_receive.setText(desc); } } } }); } // 发送带返回函数的数据 private View.OnClickListener returnHandler = new View.OnClickListener() { @Override public void onClick(View view) { Intent intent = new Intent(IntentSendActivity.this,IntentReceiveMainActivity.class); Bundle bundle = new Bundle(); bundle.putString("request_time",Utils.getNowTime()); bundle.putString("request_content",tv_send.getText().toString()); intent.putExtras(bundle); // 把返回的消息放在视图上 register.launch(intent); } }; 下一个页面
private TextView tv_receive; private TextView tv_receive_to_send; private View.OnClickListener clickFn = new View.OnClickListener() { @Override public void onClick(View v) { switch (v.getId()) { case R.id.btn_from_receive_to_send: //do something Intent intent = new Intent(); intent.setClass(IntentReceiveMainActivity.this, IntentReceiveMainActivity.class); Bundle bundle = new Bundle(); bundle.putString("response_time", Utils.getNowTime()); bundle.putString("response_content", tv_receive_to_send.getText().toString()); intent.putExtras(bundle); setResult(AppCompatActivity.RESULT_OK,intent); finish(); break; } } }; @Override protected void onCreate(Bundle savedInstanceState) { super.onCreate(savedInstanceState); setContentView(R.layout.activity_intent_receive_main); tv_receive = findViewById(R.id.tv_receive); tv_receive_to_send = findViewById(R.id.tv_receive_to_send); // 获取上一个页面传过来的意图中的数据 Intent intent = new Intent(); Bundle bundle = getIntent().getExtras(); String request_time = bundle.getString("request_time"); String request_content = bundle.getString("request_content"); String desc = String.format(" 收到请求消息:\n请求事件为%s\n请求内容为%s", request_time, request_content); tv_receive.setText(desc); Button btn_from_receive_to_send = findViewById(R.id.btn_from_receive_to_send); btn_from_receive_to_send.setOnClickListener(clickFn); }-
常用的函数调用方式:调用在下个activity自定义的方法
// 上一个活动页面调用 下一个页面的函数
// 方式三:利用下一个页面的函数 传递参数。new 实例一个活动页面,避免 静态修饰
private View.OnClickListener returnHandler2 = new View.OnClickListener() {
@Override
public void onClick(View view) {
    IntentReceiveMainActivity second = new IntentReceiveMainActivity();
    second.receiveActivityActionFn(IntentSendActivity.this, "data_01", "data_02");
}
在下一个页面 编写函数,并在onCreate中调用intent
// 方式三:利用自定义函数传递参数时,所使用的函数
     // 方式三 使用函数传递参数时,用来接收上一个页面传递过来的参数
Intent intent = this.getIntent();
if (intent != null) {
    String request_time = intent.getStringExtra("parmas_01");
    String request_content = intent.getStringExtra("params_02");
    String desc = String.format(" 收到请求消息:\n请求事件为%s\n请求内容为%s", request_time, request_content);
    System.out.println("数据为:" + desc);

    tv_receive.setText(desc);
}
}
...
public void receiveActivityActionFn(Context context, String data_01, String data_02) {
Intent intent = new Intent(context, IntentReceiveMainActivity.class);
System.out.println("数据为:" + data_01 + ";" + data_02);
intent.putExtra("parmas_01", data_01);
intent.putExtra("params_02", data_02);
context.startActivity(intent);
} -
为活动页面补充附加信息
- 利用资源文件配置字符串
// 通过 资源配置文件 读取字符串 TextView tv_weather = findViewById(R.id.tv_weahter); String value = getString(R.string.tv_weather); tv_weather.setText(value); - 利用元数据传递配置信息
// 利用 元文件 读取、传递配置信息 // 例如利用 第三方的sdk:高德地图、微信登录、友盟等等 // 分三步:1.调用getPackageManager方法获取当前应用的包管理器 // 2.调用包管理器的getActivityInfo方法获得当前活动页的信息对象 // 3.活动信息对象的metaData是Bundle包裹类型,调用包裹对象的getString获得指定名称的参数值 TextView tv_meta = findViewById(R.id.tv_meta); // 从上下文获取包管理器 PackageManager packageManager = getPackageManager(); try { ActivityInfo info = packageManager.getActivityInfo(getComponentName(),PackageManager.GET_META_DATA); // 获取活动页面附件的元数据 Bundle bundle = info.metaData; String weather = bundle.getString("weather"); tv_meta.setText(tv_meta.getText()+":" + weather); } catch (PackageManager.NameNotFoundException e) { e.printStackTrace(); } - 给应用页面注册快捷方式